
1) Manual Method
Step 3 : Search for OEMBackground, which should be in the following lacation.
Computer\HKEY_LOCAL_MACHINE\SOFTWARE\Microsoft\
Windows\CurrentVersion\Authentication\LogonUI\Background.
If the key does not exits, add a new DWORD value with the name OEMBackground.
Step 4 : Double click on the entry OEMBackground, and change the Data value from 0 to 1.


That should do the trick, now just roboot your system and enjoy.
NOTE : The image size must be less than 245KB.
Step 1 : Open the Windows Start menu and enter regedit into the search bar.
Step 2 : Right click on HKEY_LOCAL_MACHINE and select Find.
Step 3 : Search for OEMBackground, which should be in the following lacation.
Computer\HKEY_LOCAL_MACHINE\SOFTWARE\Microsoft\
Windows\CurrentVersion\Authentication\LogonUI\Background.
If the key does not exits, add a new DWORD value with the name OEMBackground.
Step 4 : Double click on the entry OEMBackground, and change the Data value from 0 to 1.

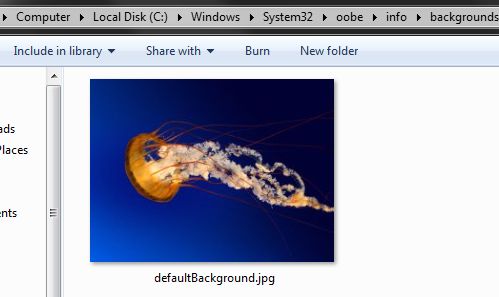
Step 5 : Open Windows Explorer and browse to the following path
%windir%\system32\oobe by typing this Address in the Address bar.
Step 6 : Create a new folder named info, and open it by double clicking.
Step 7 : Create a new folder within info named backgrounds.
Step 8 : Rename your desired wallpaper as backgroundDefault.jpg and place it inside the folder backgrounds.
That should do the trick, now just roboot your system and enjoy.
NOTE : The image size must be less than 245KB.
2) Using Logon Changer
If first method puts a knot in your stomach, then you can download Logon changer.
This software is ridiculously easy to use, it doesn't require installation, and it even has built-in tools to automatically resize and recompress your images while leaving the original file untouched. the logon changer also lets you quickly change your logon wallpaper back to windows 7 default.

Download the app from here, and then unzip the executable.
Run the program and it should resent you with a priew of your logon screen along with a few self-explanatory options.

Download the app from here, and then unzip the executable.
Run the program and it should resent you with a priew of your logon screen along with a few self-explanatory options.
No comments:
Post a Comment